MERN CI/CD Project Using AWS Cloud Native Tools
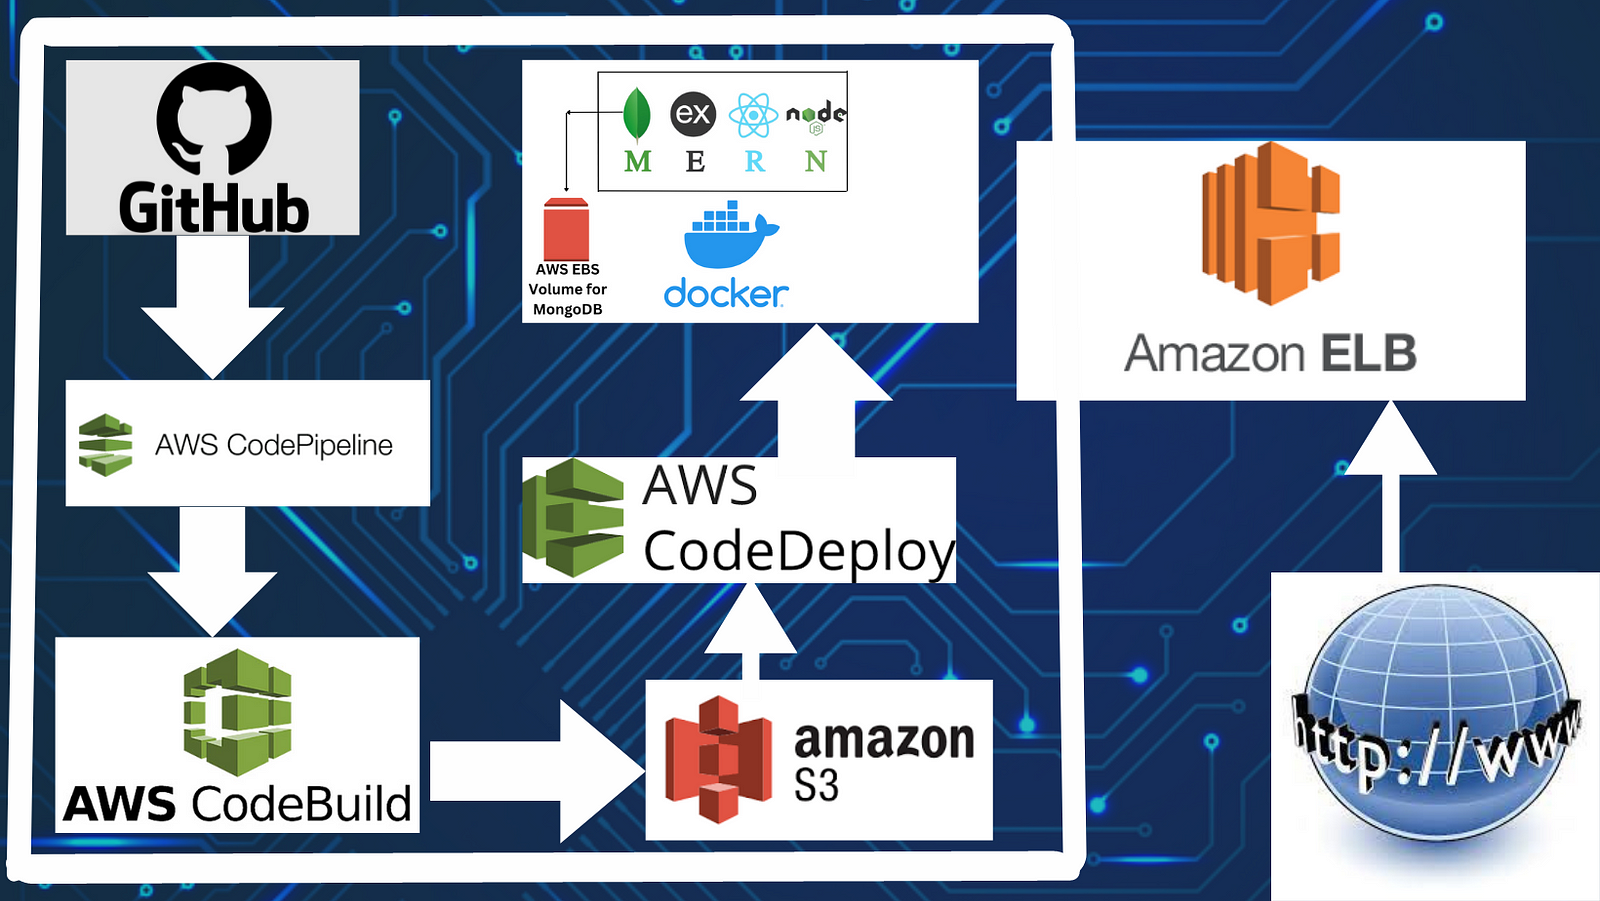
Turn any MERN stack application into a CI/CD project using the cloud native tools provided by AWS!
This article will walk you through doing just that.
We will need to modify the MERN app source code to fit the CI/CD flow.
The flow is pretty straightforward. The developer will push the code on GitHub, which triggers “AWS Codepipeline” and it will start the CI/CD pipeline by first pulling the source code and generating build using “AWS CodeBuild”. Then the generated build artifacts will be stored in the S3 bucket in versions and the application will be deployed by “AWS CodeDeploy”.
Let’s get started!!!
Step 1: AWS Role creation
AWS CodeDeploy and the EC2 instance would need permission to access the build artifacts from S3 storage.
So, we’ll begin by creating roles for them.
Go to Roles inside the IAM dashboard on the AWS console.
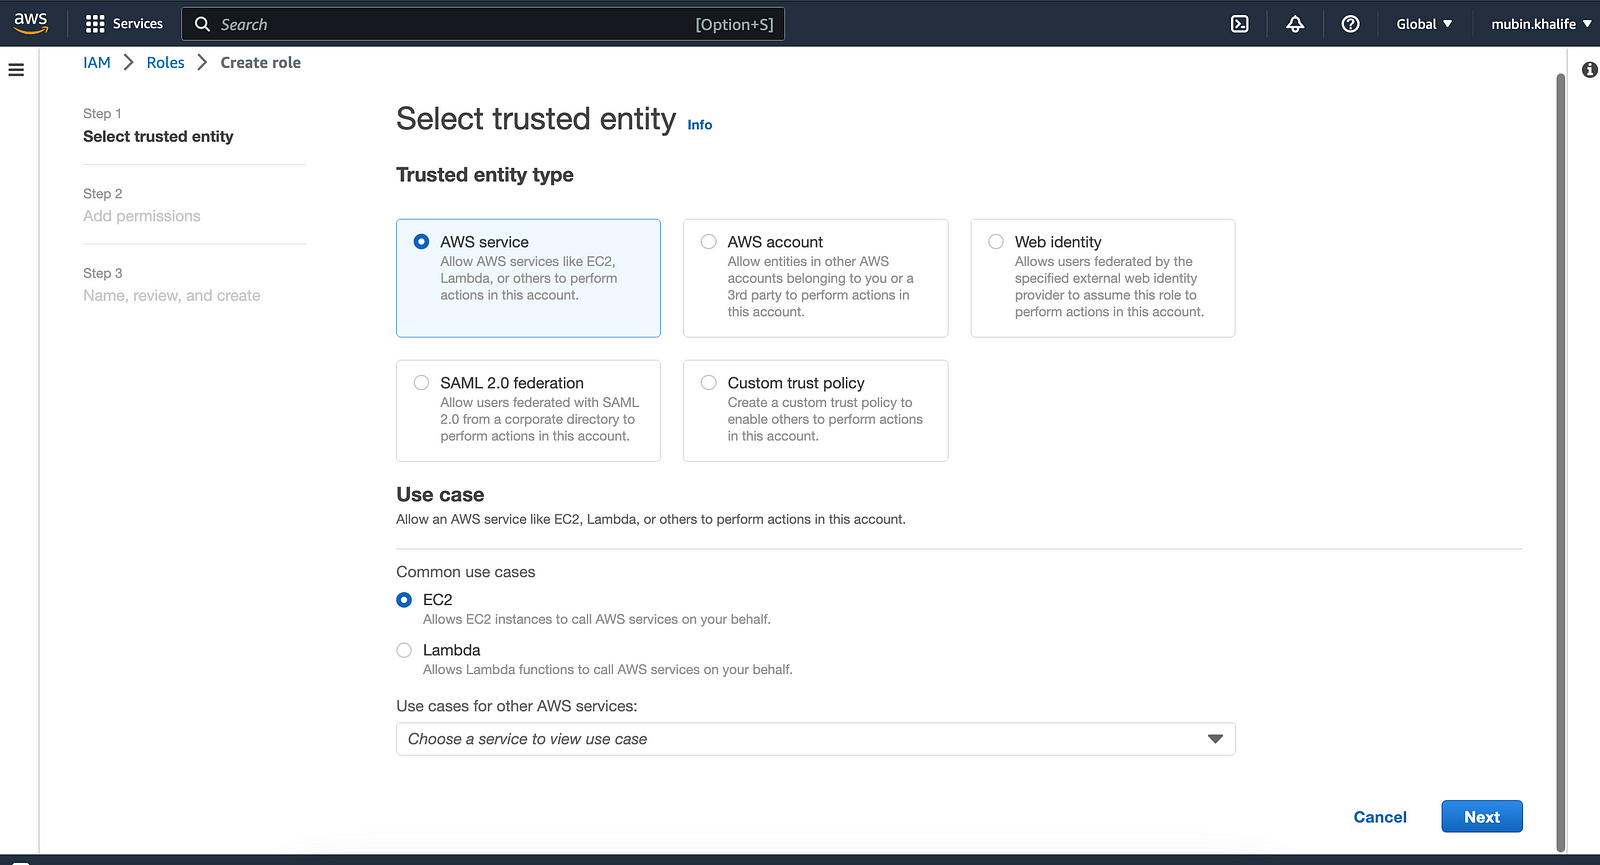
Click Create Role button. Select “AWS Service” as the entity type and “EC2” option in common use cases.
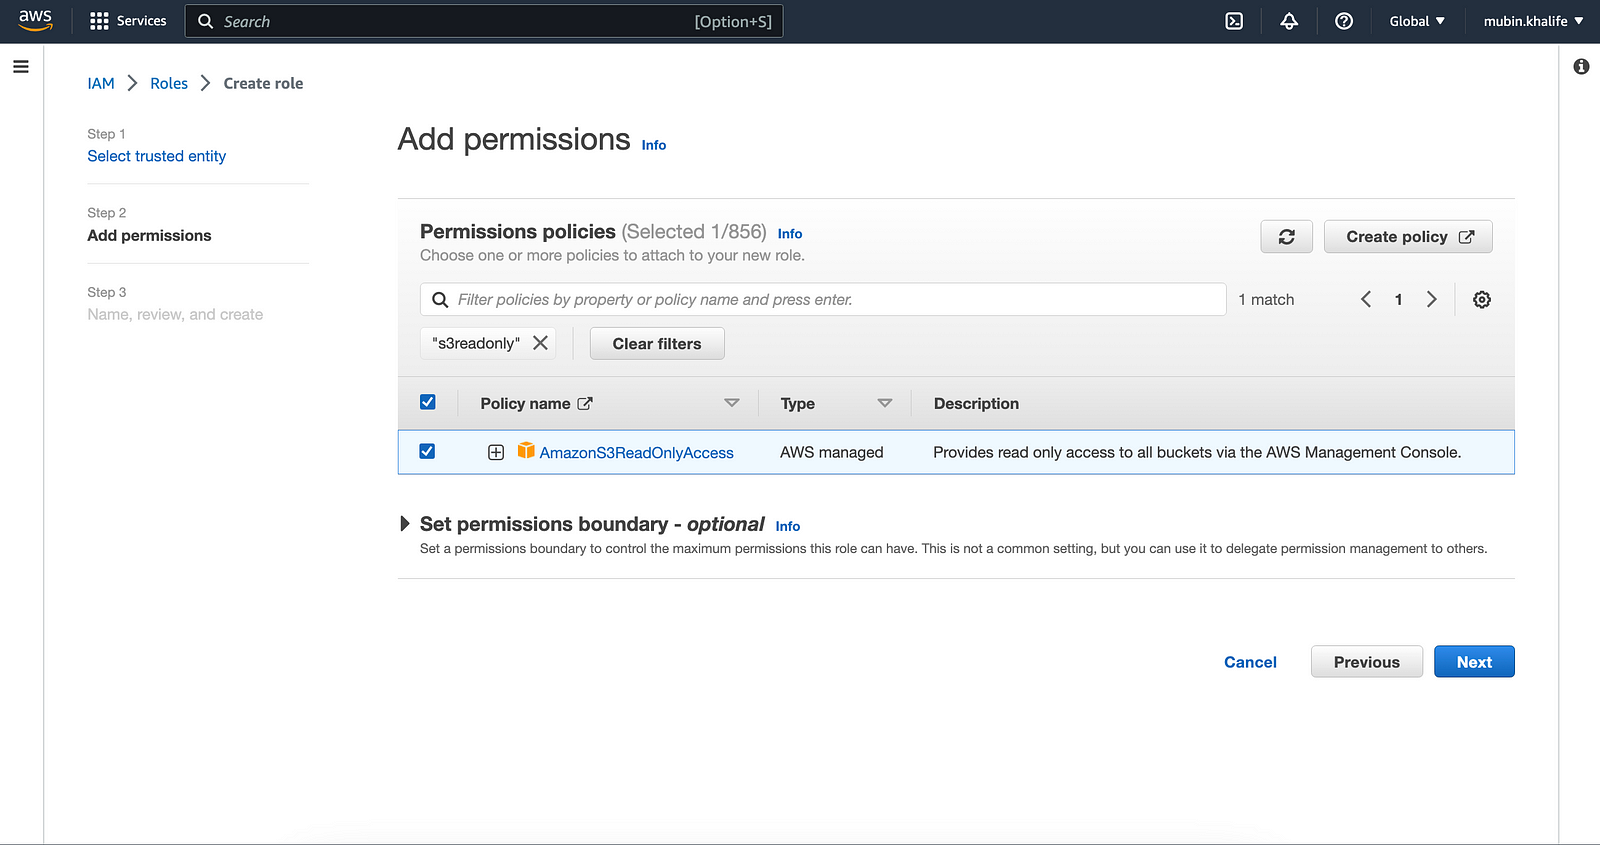
In the Permissions policy, search for “s3readonly”, select “AmazonS3ReadOnlyAccess” from the entry, and click the next button.
Give any name (like “EC2S3ReadPermission”) for this role in the text box and click create role button at the bottom of the screen.
Go back to the create role page and select “AWS service” like before, scroll down to the bottom of the page, and select “CodeDeploy” from the dropdown field in the use cases for other AWS services.
After selecting this option, select the first radio option with the text “CodeDeploy”
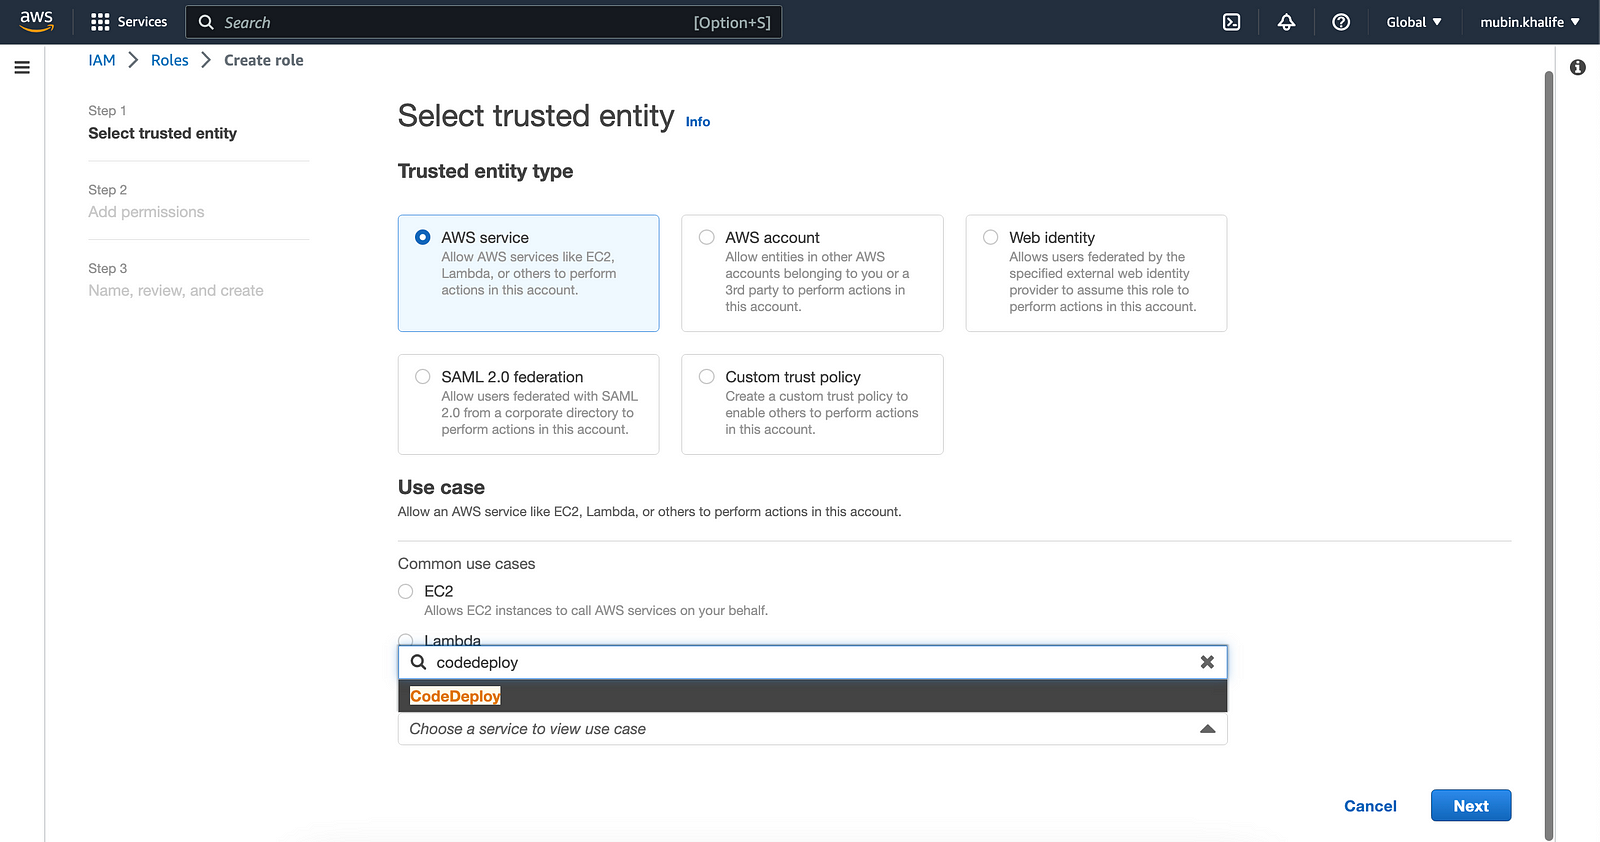
When you click next, the “AWSCodeDeployRole” policy would be attached. Click next and on the final page give a name (like CodeDeployPermission) and click “Create role”.
Step 2: Launch the EC2 instance
Now, we will launch an EC2 instance where we will run Docker.
In the EC2 launch instance page, give any name (“mern-devops”) and select Amazon Linux 2 AMI image.
In the Network Settings, allow SSH traffic and HTTP from anywhere.
If you have a key pair already select it or else create a new one.
Ensure “Auto-assign public IP” is selected in Network Settings.
Scroll down and open the “Advanced Details” section.
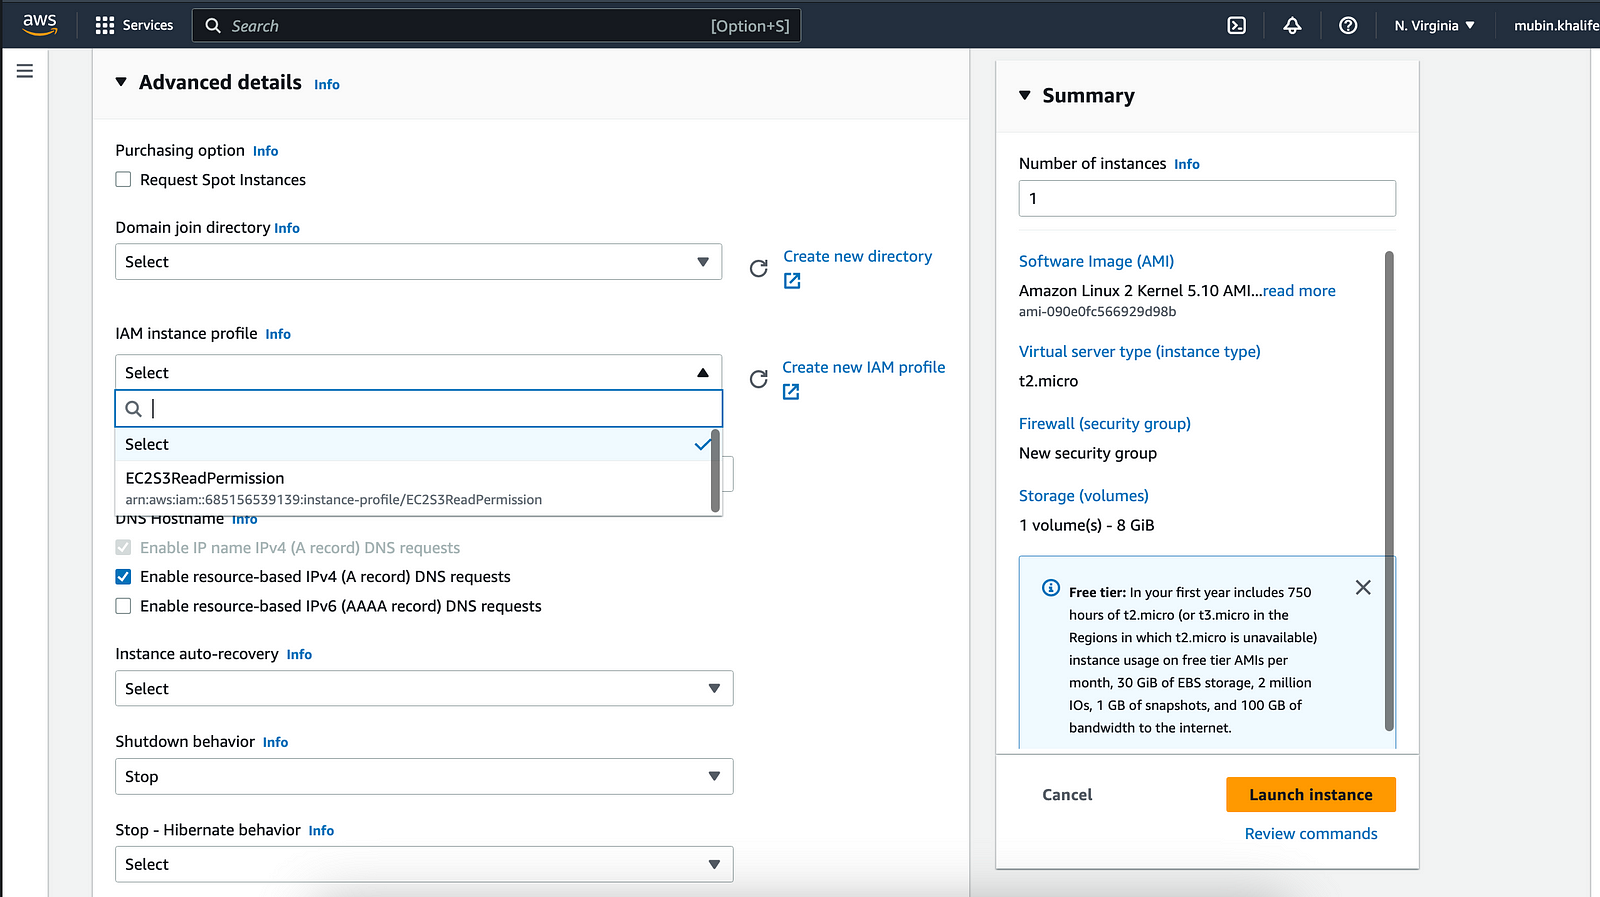
For the “IAM instance profile” field, open the dropdown and select the role created for the EC2 instance (EC2S3ReadPermission)as shown in the image below.
Once the instance is created and ready, ssh into it:ssh -i <login-key-file> ec2-user@<public-ip-of-ec2-instance>
Step 3: Configuration & Installation
Inside the terminal connected to the EC2 instance via SSH, run the update command: sudo yum update -y
Then add a user (give any name and password):
sudo su
useradd mubin
passwd mubin
Now make this user a sudoer:
echo "mubin ALL=(ALL) NOPASSWD: ALL" >> /etc/sudoers
Note: The above setting is not good for production environment.
Now switch to this user and install Docker
su - mubin

sudo yum install docker -y
Start the service: sudo service docker start
Switch to root user and add the user to the docker group
sudo su

usermod -aG docker mubin
Switch back to the normal user: su — mubin
Check the docker installation by running : docker ps
Next, install the Docker Compose tool and check its installation:
#download the binary
sudo curl -L "https://github.com/docker/compose/releases/download/1.23.2/docker-compose-$(uname -s)-$(uname -m)" -o /usr/local/bin/docker-compose

#make binary executable
sudo chmod +x /usr/local/bin/docker-compose

#check installlation
docker-compose --version
Next, we need to set up a CodeDeploy agent.
sudo yum install ruby
sudo yum install wget
wget https://aws-codedeploy-us-east-1.s3.amazonaws.com/latest/install
chmod +x ./install
sudo ./install auto
Check the status of the service: sudo service codedeploy-agent status
Let’s check if this EC2 instance has access to S3 storage. Run aws s3 ls
If we don’t get any error in the console output, it means our instance has access.
Go to the AWS console and create a bucket. Give a name like “mern-artifact-bucket” . Enable Bucket versioning and click the “Create bucket” button. You can verify bucket creation by going back into the console connected to EC2 via SSH and run aws s3 ls . And you should see the name of the bucket appearing.
Step 4: Prep existing MERN app source code
Now we need a MERN app source code from GitHub or any other platform that we can use.
You can search for it or use your own existing repo.
I am going to follow an architecture where you have a “client” folder for the front-end and a “server” folder for the back-end. You can also put source code for front-end from a separate repo and put it inside “client” directory and place back-end source code from another repo and place it inside “server” directory. Please ensure that there is no .git folder in either of “client” and “server” directory.
I am going to use my own MERN stack app code which is a StackOverflow clone. The repo location for this project can be found here. I’ll be removing the .git folder from the root of the repo, since I’ll be modifying it and creating it as a new repo for our CI/CD project.
Once you have the source code in your local system, open it up in your favorite code editor.
First, create a folder, in the root path of our source repo, by the name “nginx” with nginx.conf file inside it with the following content:
#vi nginx.conf
upstream nodeapp{
     server node_app:3001;
}

server {
  listen 80;
  root /usr/share/nginx/html;
  index index.html;

  location / {
   try_files $uri /index.html =404;
  }

  location /test {
 proxy_pass http://nodeapp/test;
        proxy_set_header X-Forwarded-For $proxy_add_x_forwarded_for;
        proxy_set_header Host $host;
        proxy_redirect off;
  }

  location /user/ {
        proxy_pass http://nodeapp/user/;
        proxy_set_header X-Forwarded-For $proxy_add_x_forwarded_for;
        proxy_set_header Host $host;
        proxy_redirect off;
    }

    location /questions/ {
        proxy_pass http://nodeapp/questions/;
        proxy_set_header X-Forwarded-For $proxy_add_x_forwarded_for;
        proxy_set_header Host $host;
        proxy_redirect off;
    }

    location /answer/ {
        proxy_pass http://nodeapp/answer/;
        proxy_set_header X-Forwarded-For $proxy_add_x_forwarded_for;
        proxy_set_header Host $host;
        proxy_redirect off;
    }

    location /static/css {
        alias /usr/share/nginx/html/static/css;
    }

    location /static/js {
        alias /usr/share/nginx/html/static/js;
    }

    location = /favicon.ico {
        alias /usr/share/nginx/html/favicon.ico;
    }

}
As seen from the above file we are configuring Nginx by setting up reverse proxy and API endpoints defined in each location directive based on the routes defined in the back-end of application source code. We are giving an alias of “node_app” for our back-end server.
Then create Dockerfile inside the server directory with the following content:
#vi server/Dockerfile
FROM node:latest

WORKDIR /app

COPY . .

RUN npm install

EXPOSE 3001
Create a file .dockerignore with the content node_modules , both in the root project and inside the server directory
Next, create Dockerfile in the root of the repo with the following content
#vi Dockerfile
FROM nginx:latest

WORKDIR /usr/share/nginx/html

COPY . .

RUN rm /etc/nginx/conf.d/default.conf

COPY ./nginx.conf /etc/nginx/conf.d

ENTRYPOINT [ "nginx" , "-g" , "daemon off;" ]
In this file, we are setting up a working directory for the client side, copying all files from the build into the working directory,
replacing default nginx default configuration with our custom configuration file and running nginx in the foreground (so that container keeps running without halting).
Copy this Dockerfile inside the nginx folder as well.
Then create a “docker-compose.yml” file with the following content:
#vi docker-compose.yml
version: "3.3"
services:
  nginx_app:
    container_name: nginx_app
    build:
      context: ./nginx
      dockerfile: Dockerfile
    ports:
      - 80:80
    restart: always

  node_app:
    container_name: node_app
    build:
      context: ./server
      dockerfile: Dockerfile
    command: npm start
    restart: always
    expose:
      - 3001
    ports:
      - 3001:3001
    links:
      - mongo_db

  mongo_db:
    container_name: mongo_db
    image: mongo
    volumes:
      - mongo_volume:/data/db
    expose:
      - 27017
    ports:
      - 27017:27017

volumes:
  mongo_volume:
In this file, we are defining services for Nginx, server, and Mongo DB. We are also setting up containers for each of the services.
Important: Please use the version specified as it is, else you will encounter error during deployment
Next, create a scripts folder in the root of the repo and put two bash files inside it (start-containers.sh and stop-containers.sh ) with the following respective content:
#start-containers.sh

#!/bin/sh
cd /home/mubin/devopspipeline

docker-compose build
docker-compose up -d
#stop-containers.sh

#!/bin/sh

cd /home/mubin/devopspipeline
sudo cp -r build/* nginx

if ! docker info > /dev/null 2>&1; then
    service docker start
fi

docker-compose down
echo $?
In start-containers.sh script file we are navigating to the “devopspipeline” directory inside the home directory of our user and then
running docker-compose build which will read our docker-compose.yml which in turn will look for all services and run a docker build for each one. And finally docker-compose up -d to create and start containers in the background.
In stop-containers.sh, we are copying all the files from the build into the nginx and shutting down containers. The next code snippet checks if the docker is started or not. If it is not running then start the service. This is required when you stop your instance for some reason and resume again. Also in a fresh deployment, there will be no containers, the last command echo $? will output a non-zero value.
Now open up your .env file or the file where the Mongoose connection is being made and change the Mongo URL asmongodb://mongo_db:27017/stack-overflow-clone
Instead of using localhost or “127.0.0.1”, we are using “mongo_db”, since this is what we have specified in the docker-compose.yaml
In the package.json file located inside the client directory, add the Nginx proxy:
"proxy": "http://node_app:3001",
Also, replace any localhost with the public IP of the EC2 instance on the client side (either in .env) or wherever the client is referencing the server/back-end.
To wind up our MERN source code we need two more files: appspec.yml and buildspec.yml.
The appspec.yml will be used by AWS CodeDeploy to manage deployment, while buildspec.yml which contains a collection of build commands and related settings that will be used by AWS CodeBuild.
So in the root path of the repo, create these two files with the following content:
#vi appspec.yml
version: 0.0
os: linux
files:
  - source: /
    destination: /home/mubin/devopspipeline
permissions:
  - object: scripts/
    mode: 777
    type:
      - directory
hooks:
  AfterInstall:
    - location: scripts/stop-containers.sh
      timeout: 300
      runas: root
  ApplicationStart:
    - location: scripts/start-containers.sh
      timeout: 300
      runas: mubin
#vi buildspec.yml
version: 0.2
phases:
  install:
    commands:
      - echo "the installation phase begins"
  pre_build:
    commands:
      - echo "the prebuild phase begins"
      - cd client
      - npm install
  build:
    commands:
      - echo "the build phase begins"
      # - echo `pwd`
      - npm run build
      # - echo `ls -la`

  post_build:
    commands:
      - echo "the post build phase. navigating back to root path"
      - cp -R build/ ../

artifacts:
  files:
    - build/**/*
    - appspec.yml
    - server/**/*
    - nginx/*
    - scripts/*
    - docker-compose.yaml
    - Dockerfile
In appspec.yml file, we define our deployment configuration like the choice of the operating system, recursively copy all files from/ path to “devopspipeline” directory inside our user’s home directory and then run scripts in respective hook actions. If the “devopspipeline” directory doesn’t exist, it will get created during the deployment process. Next, we are giving execute permission to all files in the scripts directory.
The “AfterInstall” hook is triggered after the CodeDeploy operation is completed i.e. after our app is deployed.
In buildspec.yml file, we are specifying certain commands at different phases (majorly to build front-en d/client side) and finally defining our list of artifacts.
Important: Please ensure that version mentioned in both appspec.yml and builspec.yml is same as written in the snippet above. Otherwise you will encounter errors.
Note:
**/*represents all files recursively.
That’s it! With the above structure, set this up as our new repo on GitHub.
Step 5: AWS Tools setup and manual flow
Go to the CodeBuild page on AWS Console. Then click the “Create build project” button.
Give a name like “MyMernBuild”.
Scroll down and in the Source section, select “GitHub” as the source provider and select the “Repository in my GitHub account” option in the Repository field. Click Connect to GitHub. In the pop-up window, provide your GitHub credentials and provide confirmation of access.
you should see a message like “You are connected to GitHub using OAuth”.
Enter the URL of your repo. Enter “main” as the source version. Scroll down to the Environment section and select “Amazon Linux 2” as the operating system. Select “Standard” as runtime.
Select “aws/codebuild/amazonlinux2-arch-x86_64-standard:4.0”. Select “Linux” as the environment type.
For the “Service role” field, select the “New service role” option.
In the Role ARN field, select a new service role and give a name (“MyMernBuild”).
Scroll to the Buildspec section, and make sure the “use a buildspec file” option is selected.
Also since we have named our file as “buildspec.yml” we can leave the Buildspec name field blank. Had the file name been different, we would have had to enter that in this field.
Scroll down to the Artifacts section, and select the Amazon S3 option in the type field.
Enter the bucket name (“mern-artifact-bucket”) that we created at the beginning of the project.
Select the “Zip” option for the Artifacts packaging field.
Check the CloudWatch logs as it will help us in reading logs in case something fails in the pipeline. Give any group name (“mymernbuildlogs”) and stream name (“mymernlogs”).
Click the “Create build project” button.
Since we added a new service role we need to give this role S3 permission.
So go to the Role section on the IAM page. Click on the new role name we have given (MyMernBuild). Then click “Add Permissions” to open the dropdown and then click “Attach policies”. In the new window, by “s3fullaccess”. Check “AmazonS3FullAccess” and click the “Add permissions” button. Once this permission is added, come back to the CodeBuild page.
Click the “Start build” button. This will start to create a build and also upload it to our S3 bucket, wait until the build succeeds.
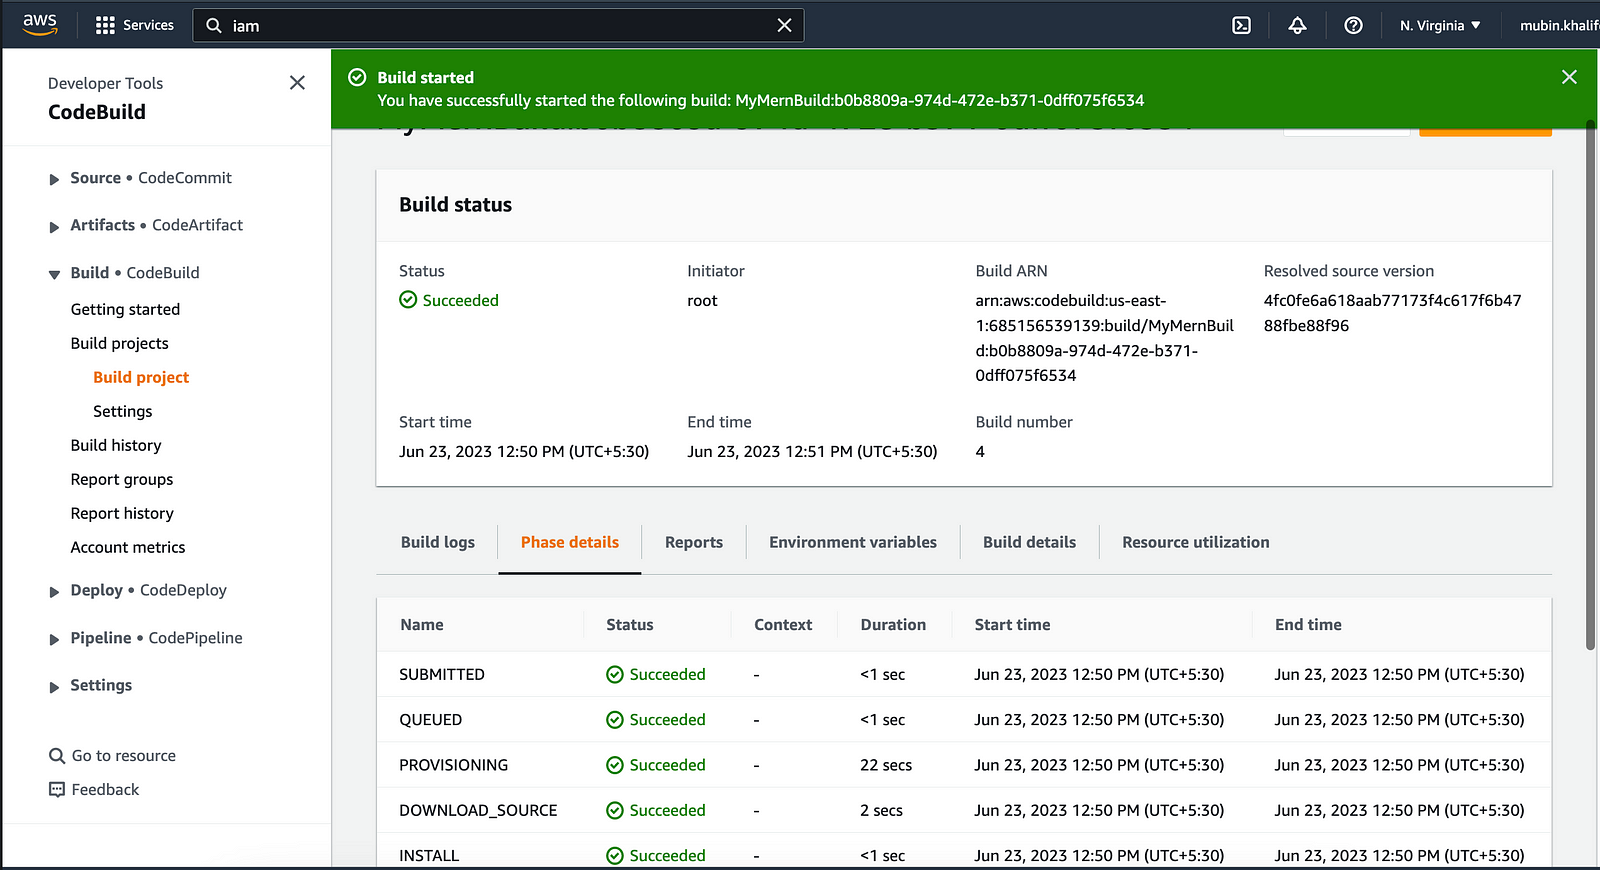
You can then verify whether all artifacts are present in the bucket by going into the S3 bucket page and clicking the Download button.

You can tick the checkbox against your build name and click download. You should see a zip file getting downloaded.
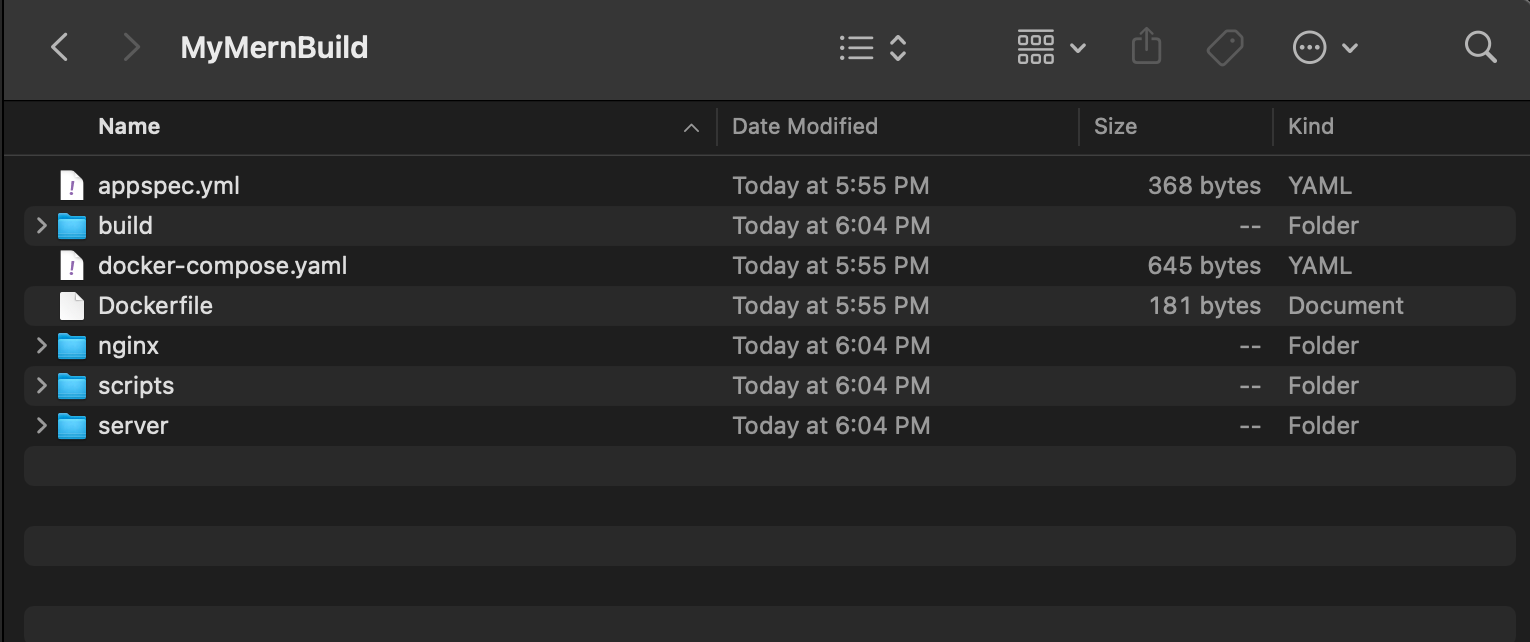
You can unzip and verify that it contains all the artifact files and folders specified in the buildspec.yml file are present in the zip file.
Now go back to the AWS console in the browser and search for CodeDeploy in the search bar and open the AWS CodeDeploy page. Click Application from the left menu.
Then click Create Application button.
Give it a name like “MyMernDeploy” and for the Compute platform, select the “EC2/On-premises” option.
Click on the Create button.
Once created, click the “Create deployment group” button.
On its creation page, enter a deployment group name (like “MyMernDeploymentGroup”).
In the Service role section, type the role name that we created earlier for CodeDeploy (we gave “CodeDeployPermission”)
and select the option accordingly.
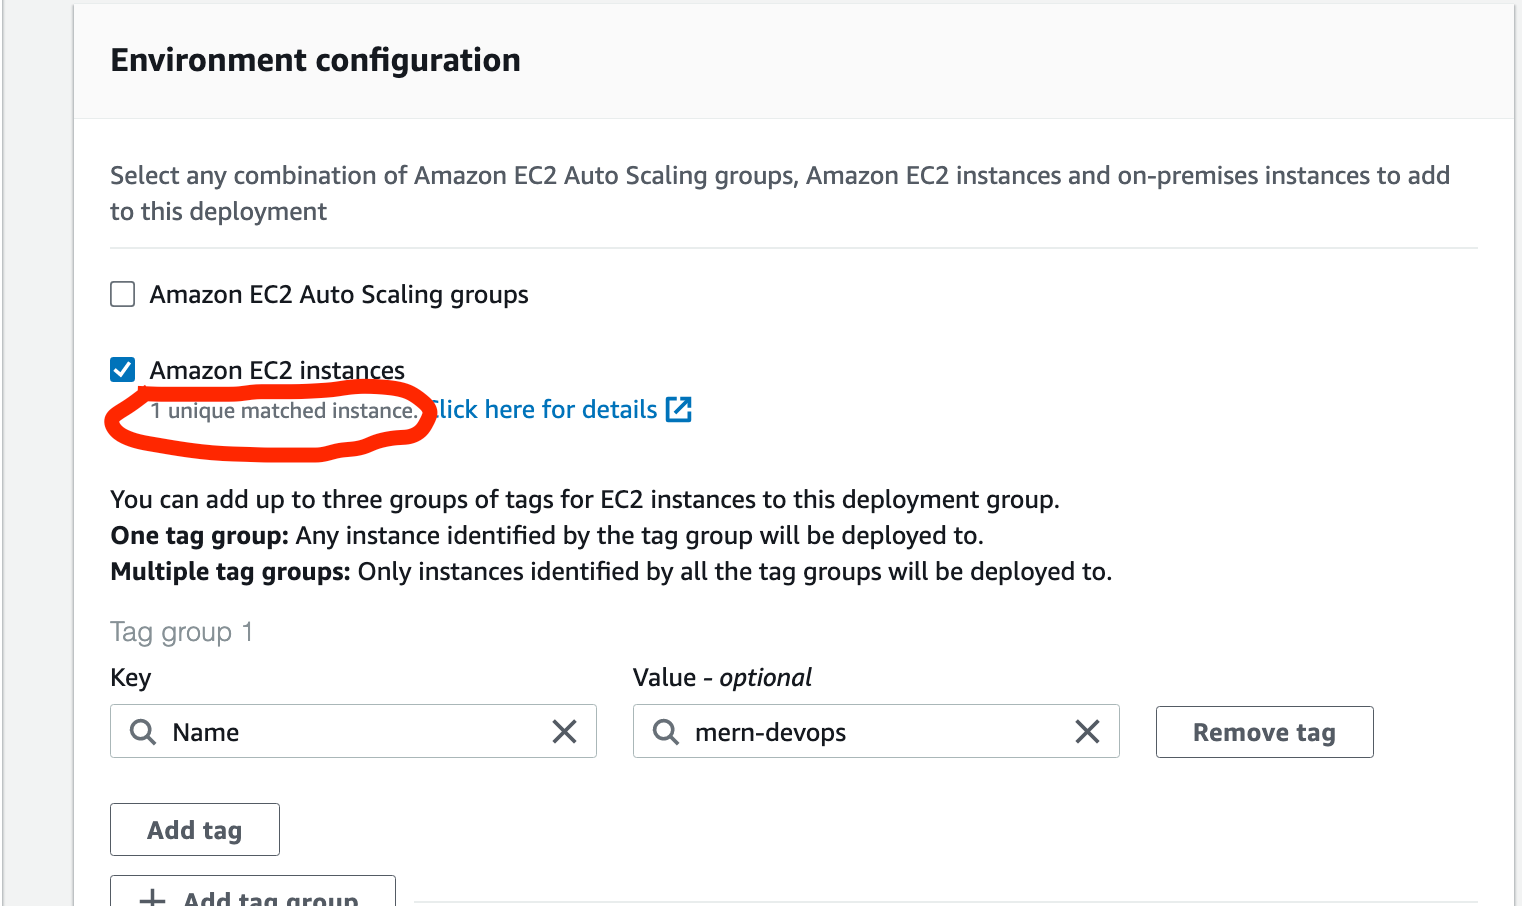
In the environment configuration, tick the “Amazon EC2 instances” and in the tags field, enter “Name” as the key and value as “mern-devops” (the one which we gave to our EC2 instance at the beginning). Once you do this, you should see a message like this:
Scroll down and uncheck Load Balancer, since we will be creating it manually later. Click Create button.
Once the Deployment group is created, click the “Create deployment” button.
In this screen, ensure that for the Revision type field “My application is stored in Amazon S3” is selected.
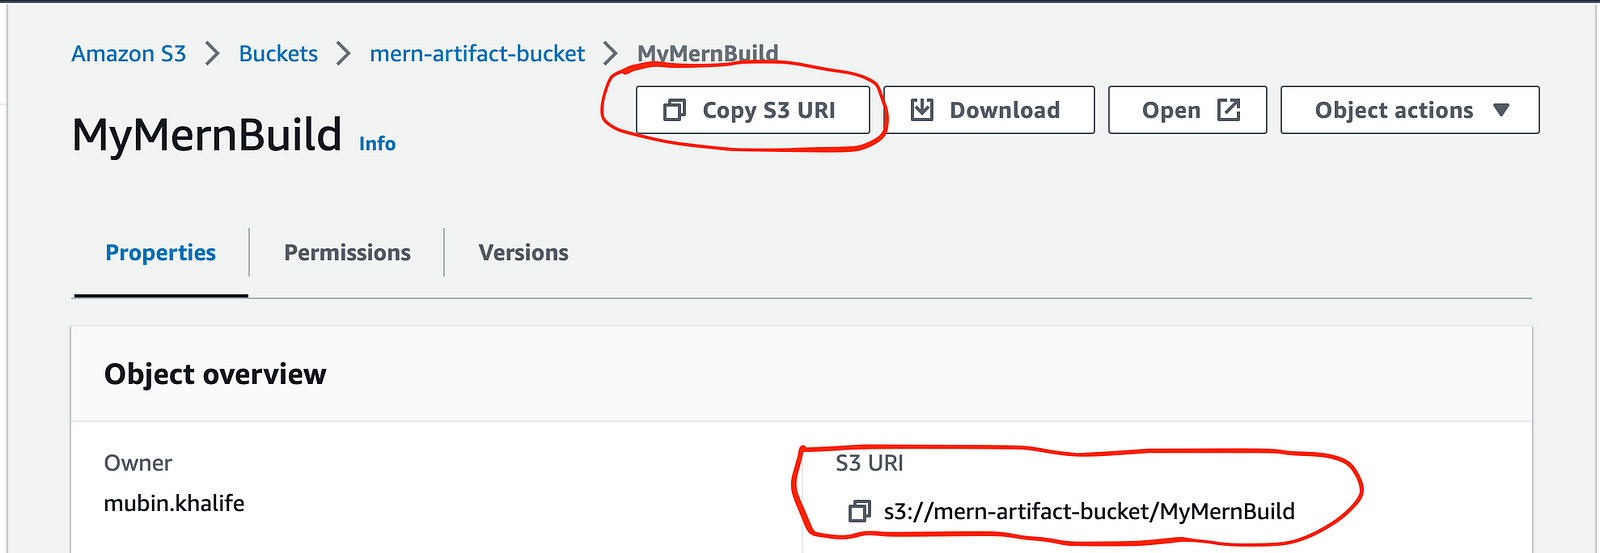
Copy the S3 URI from the S3 bucket page and paste it into the “Revision location” field.
Then select “zip” as an option for the Revision file type field.
Click create deployment button.
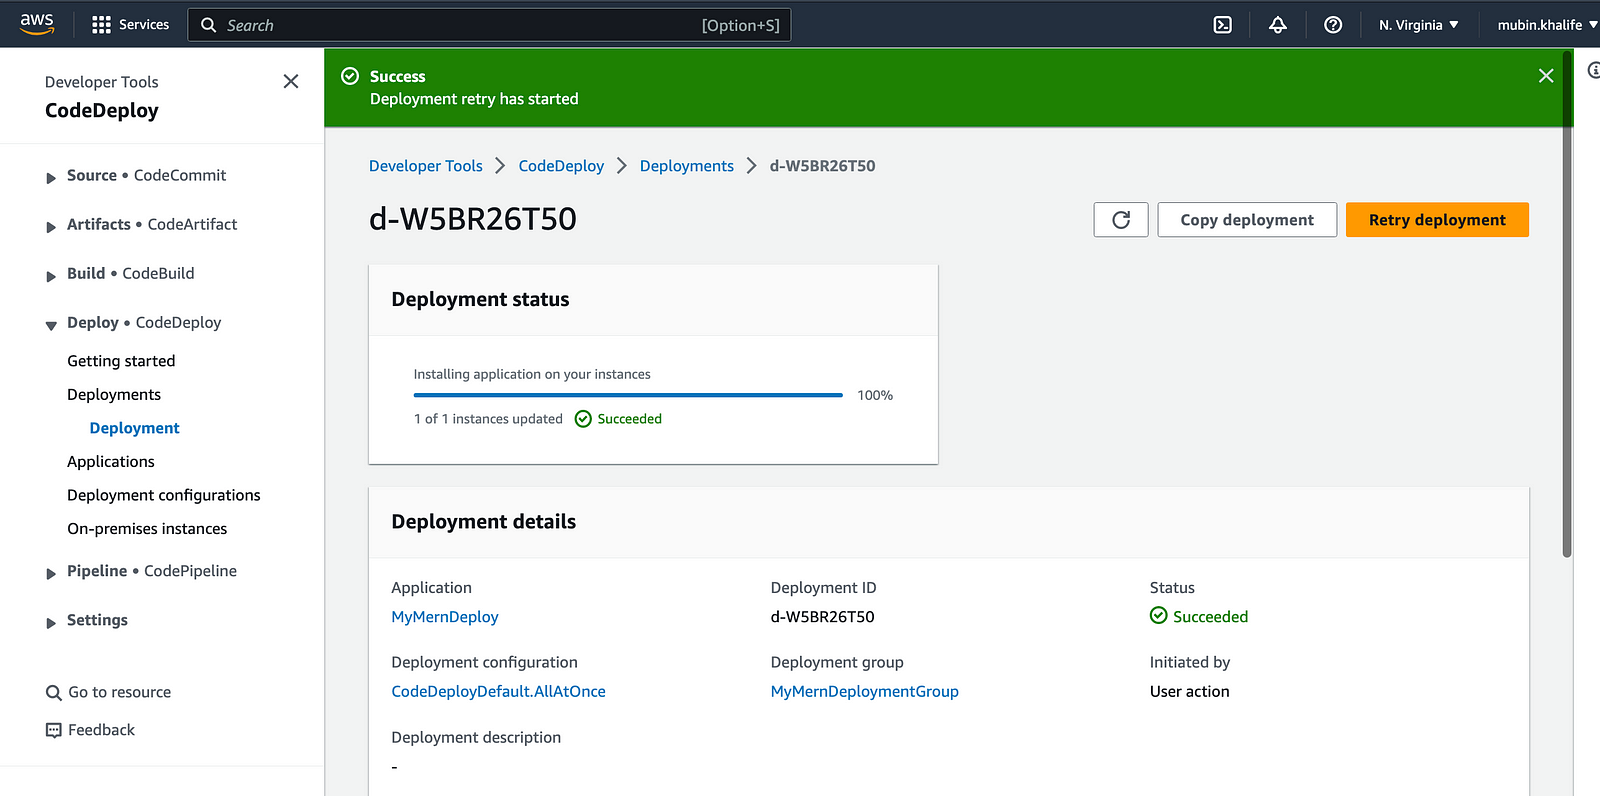
Once the deployment is created, you should see all the artifacts in the “/home/mubin/devopspipeline” directory.
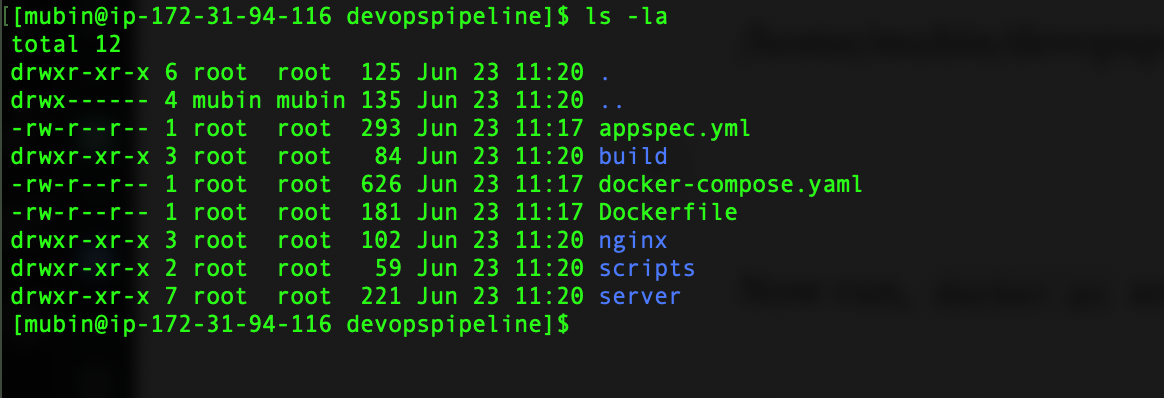
Note: To see deployment logs, open terminal connected to EC2 instance via SSH
tail -50 /var/log/aws/codedeploy-agent/codedeploy-agent.log
Now run, docker ps and you should see the containers running.
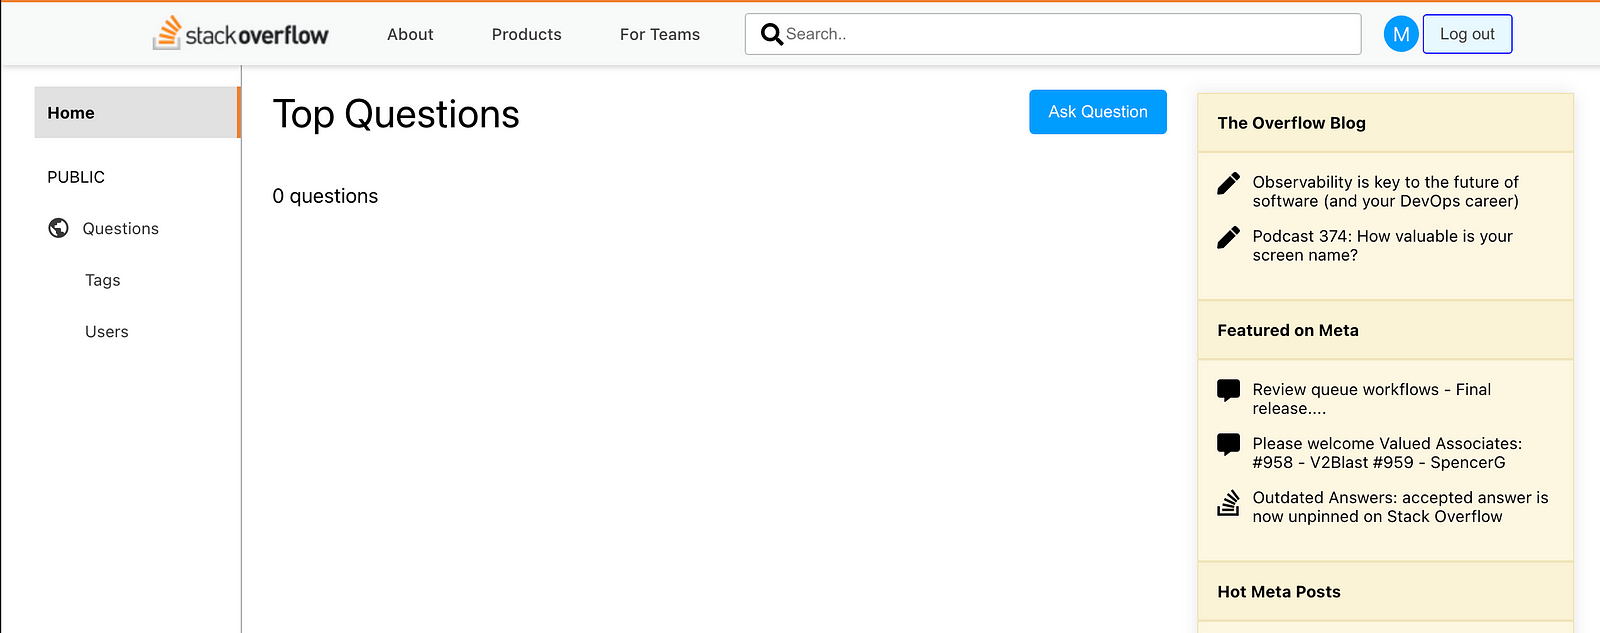
If you copy the EC2 instance public IP and paste it into the browser, you should see our app running.
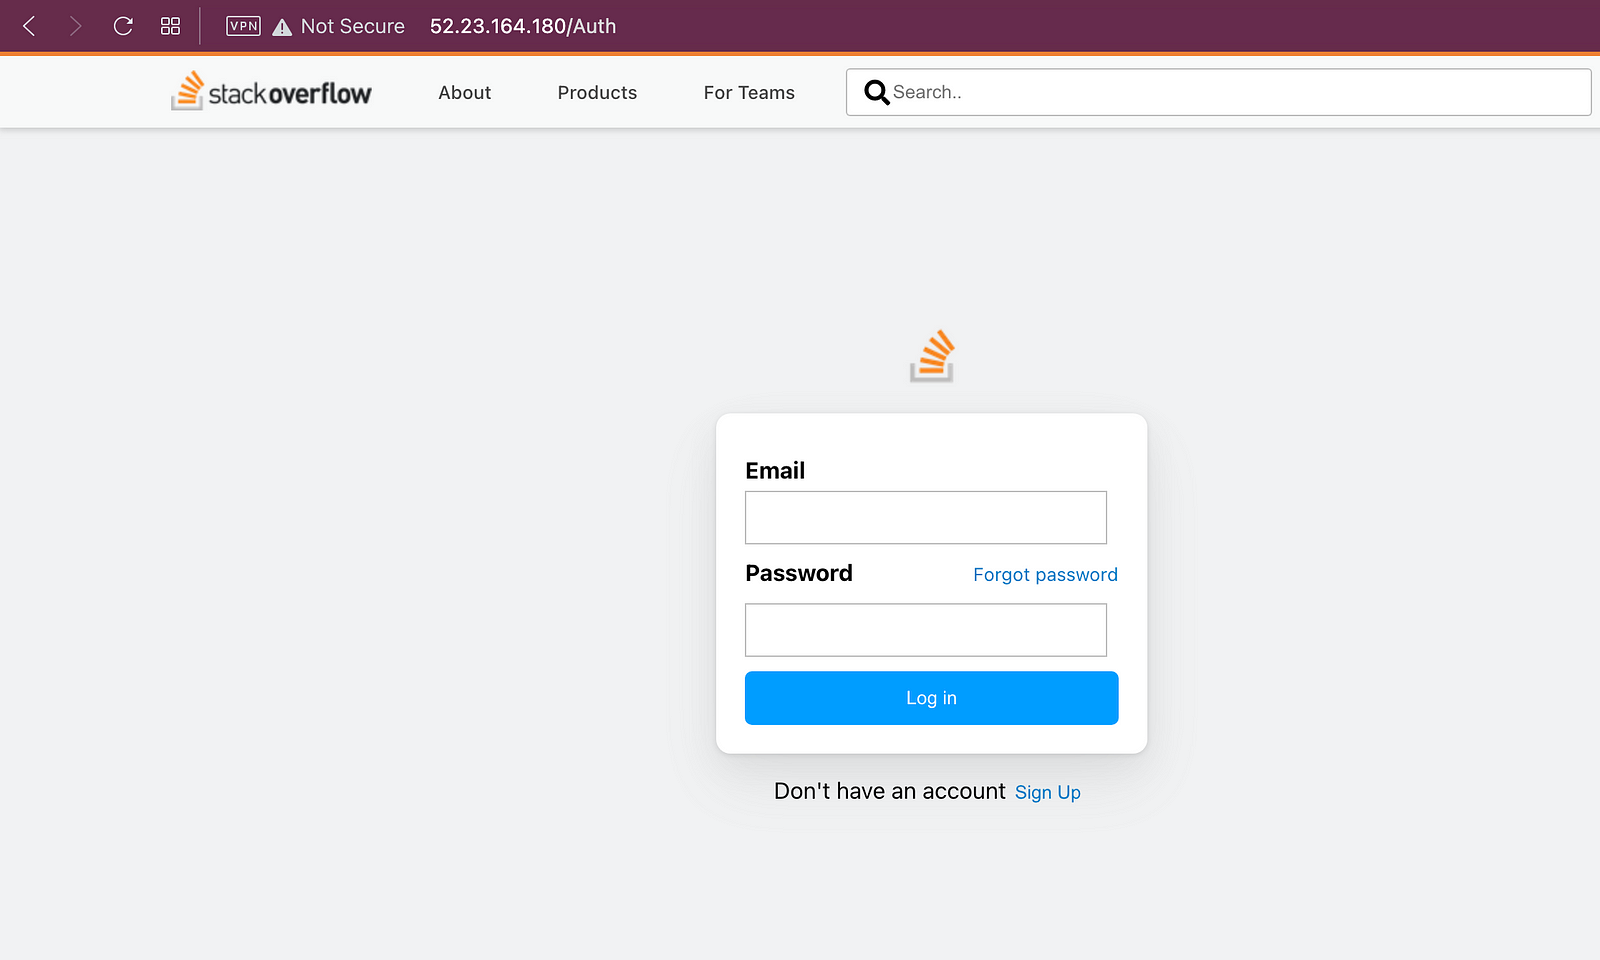
Try out registering as a new user and then log in. The application should be working.
Now we need to automate the flow, so that every time we push the changes, AWS CodeBuild will be triggered, which will in turn trigger AWS CodeDeploy.
Step 6: AWS CodePipeline
Back in the AWS console in the browser, search for CodePipeline.
On the Codepipeline page, click the “Create pipeline” button.
Give a name like “MyMernPipeline”.
Select “New service role” in the Service role field.
Expand the “Advanced Settings” section and select the “Custom location” option and enter the bucket name in the Bucket field, click the next button. In the next screen, for the Source provider field, select GitHub Version 1 option, since we will be using password-based authentication.
It is recommend by AWS to use GitHub version 2.
Click the “Connect to GitHub” button.
In a new pop-up window, click confirm button and you should see that the pop window gets closed and a success message.
Enter the repository name and main as the branch. Select “GitHub webhooks” as the Change detection option and click next.
On the next page, select AWS CodeBuild as the Build provider. Enter “MyMernBuild” in the Project name and click next.
On the next page, select AWS CodeDeploy as the Deploy provider. Enter “MyMernDeploy” in the Application name field.
Enter “MyMernDeploymentGroup” in the Deployment group field and click next.
Click create pipeline button.
Once the pipeline is created, you should the three stages, where the first stage is the source from GitHub, the second stage is to build from CodeBuild, and deploy using CodeDeploy.
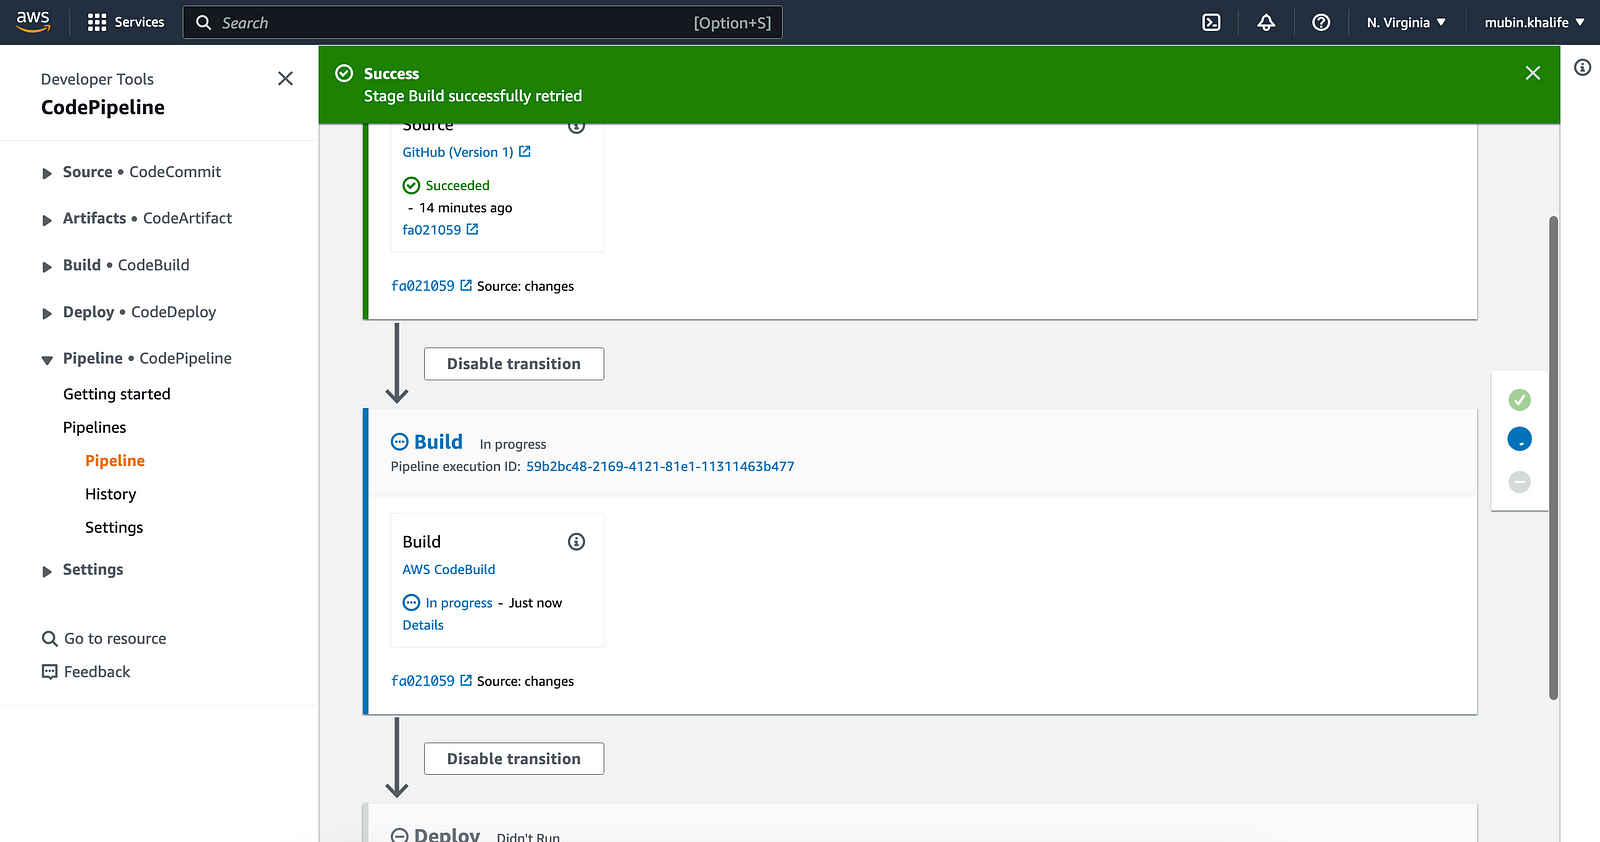
So every time we push any changes to the repository, the pipeline will trigger and stages will run.
Also every time new changes are incorporated, artifacts will be generated with the same name. Hence the need for versioning in the S3 bucket, otherwise the build will fail.
Try changing some text or styling and push to GitHub and you should see the pipeline starting after the pipeline flow is complete, your new changes should be reflected on the web page.
Meanwhile, in the terminal connected to the EC2 instance via SSH, we will go into the container running Mongo docker exec -it <container-id-of-mongo> bash
Type mongosh and its shell should open.
run the command to show all databases: show dbs; and you should see your database.
Switch to our database use stackoverflow-clone
Show all users: db.users.find().pretty()
If you have registered in the application, you should see the user entry here:

Exit out of the shell by typing: exit. Type exit again to come out of the container.
Step 7 (Optional): Separate Volume for MongoDB
A recommended approach is to use persistent storage for MongoDB so that in the event of the instance getting terminated or corrupted our database is safe.
So we need to create a separate EBS volume and attached it to our instance and then mount that directory for MongoDB to use.
Go to the EC2 dashboard in the browser and click Volumes under the Elastic Block Store section. Click Create Volume. Select “gp2” as the volume type and can keep any size, but a minimum of 8GB is required. Ensure that this volume must be in the same availability zone (AZ) as the instance. You can check that by going to the details of the EC2 instance and under the Networking tab, see the AZ mentioned.
Add tag, with key as “Name” and value as “mern-mongodb-volume” and click create volume.
Once created, tick the checkbox against the volume name and click the Action button at the top and click Attach Volume. Enter the Instance by typing the tag and click attach.
Now, check if the volume is getting listed in our instance, by running the lsblk command in the terminal connected via SSH. You should see a new volume.
To check if our EBS volume is attached to any directory run:sudo file -s /dev/xvdf
The output /dev/xvdf: data implies it is not attached to any directory.
In order to use, it we need to format it first.sudo mkfs -t xfs /dev/xvdf
Then create a directorysudo mkdir /mongodbvolume
Now mount the drive to the created directorysudo mount /dev/xvdf /mongodbvolume
You can now access this directory and it should be empty.
Now, go to docker-compose.yaml file and make the following changes:
volumes:
 - mongo_volume:/data/db`
to
volumes:
 - /mongodbvolume:/data/db
and comment volumes section
#volumes:
# mongo_volume:
Now push this code change via git which will trigger the AWS CodePipeline.
Now in the terminal connected to our EC2 instance via SSH, go inside the container (docker exec -it <container-id-of-mongo> bash) and again run the commands to show all users, you will find it empty i.e. there will be no output.
This is because we have changed the volume. So go back to the application in the browser and register as a new user.
Then come back to this mongo shell container and you should see the created user.
Step 8 (Optional): Create LoadBalancer
In this final step, we will make our application accessible via AWS ELB.
So open the EC2 dashboard in the AWS console in the browser.
First, go to Security Groups and click Create. Give a name like “my-mern-sg”. Give the same description as the name. Select the default VPC. Click “Add rule” in the Inbound rules section. Enter port 80 in the Port range. Enter “0.0.0.0/0” as the CIDR block in Source and click create.
Next, in the left menu click LoadBalancer and click the “Create load balancer” button. Create an “Application Load Balancer”. Enter a name (like my-mern-lb). Select at least two AZ. And in the Security Groups, enter my-mern-sg which we created above.
In the “Listeners and routing” section, click “Create Target Group”.It will open a new window. In the new window of the Target Group creation screen, select Instances as the target type and give a target group name (like my-mern-tg). Ensure that the VPC is the default one. Expand the Tags section and enter “Name” as the key and “mern-devops” as the value (same tag as the EC2 instance). Keeping the rest of the field the same, click the next button at the bottom. In the next screen select our instance in the “Available instances” section and then click the “Include as pending below” button.
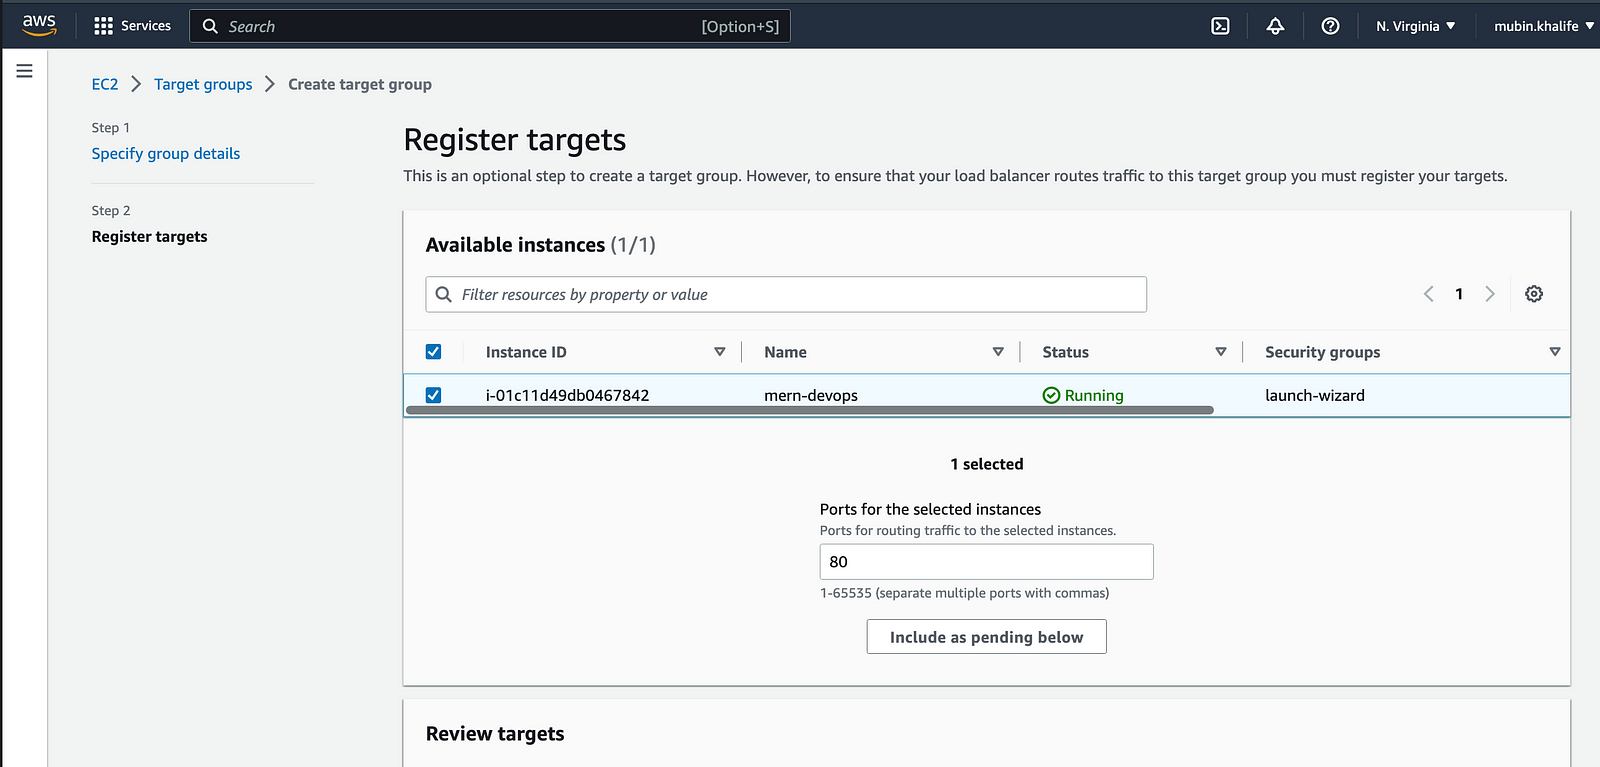
Then click “Create target group” at the bottom of the screen. Back in the “Listeners and routing” section in the LoadBalancer screen, click the refresh icon button and then select the target group we just created, and finally click create the load balancer.
Now go to the EC2 instance and in the networking tab, click the security group link under the Security tab. Click edit inbound rule. Click Add rule. Enter the “my-mern-sg” that we created and click save.
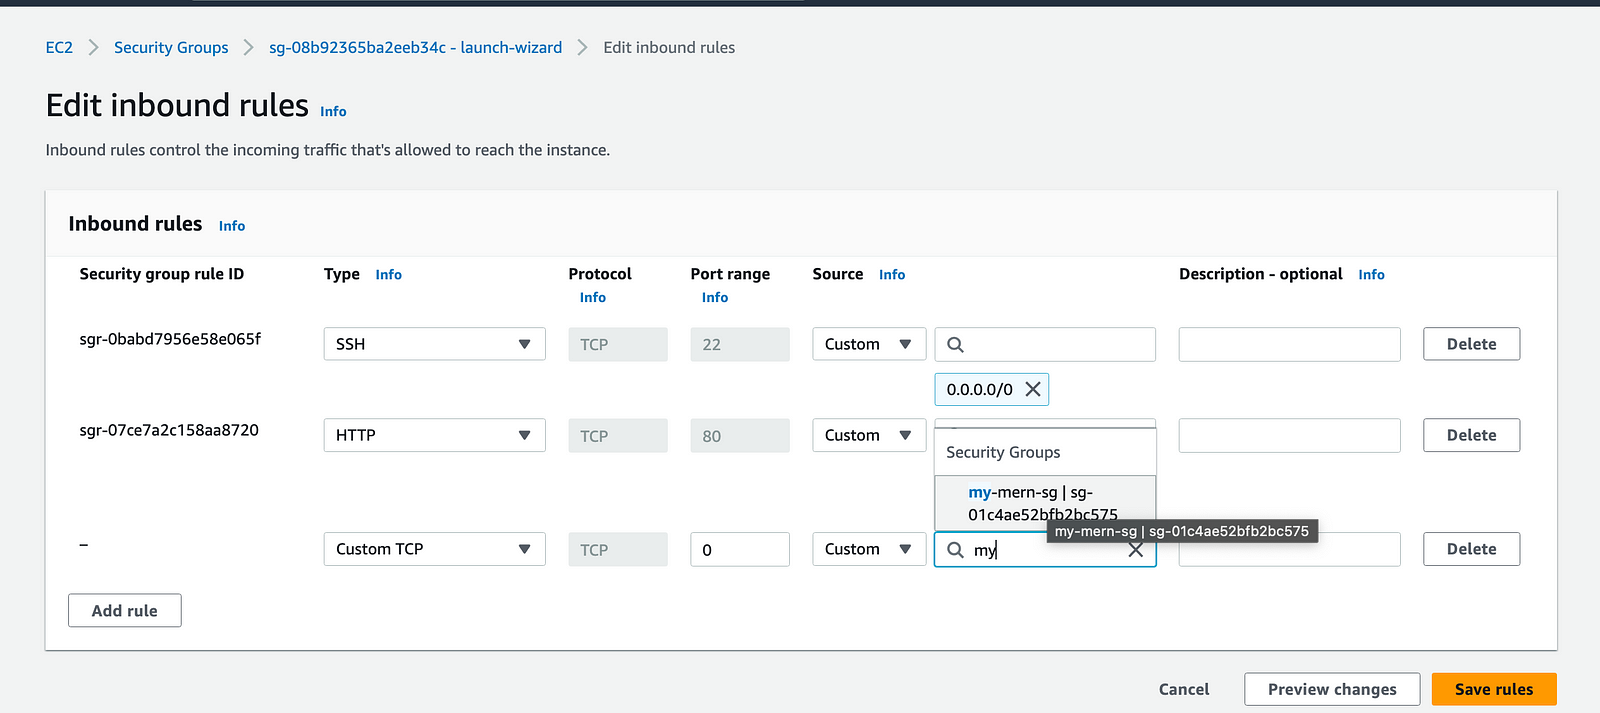
Now if you go back to the browser, our application will not load as we have configured our instance to run on LB.
So go to the created LB page and copy the DNS name and paste it into the browser.
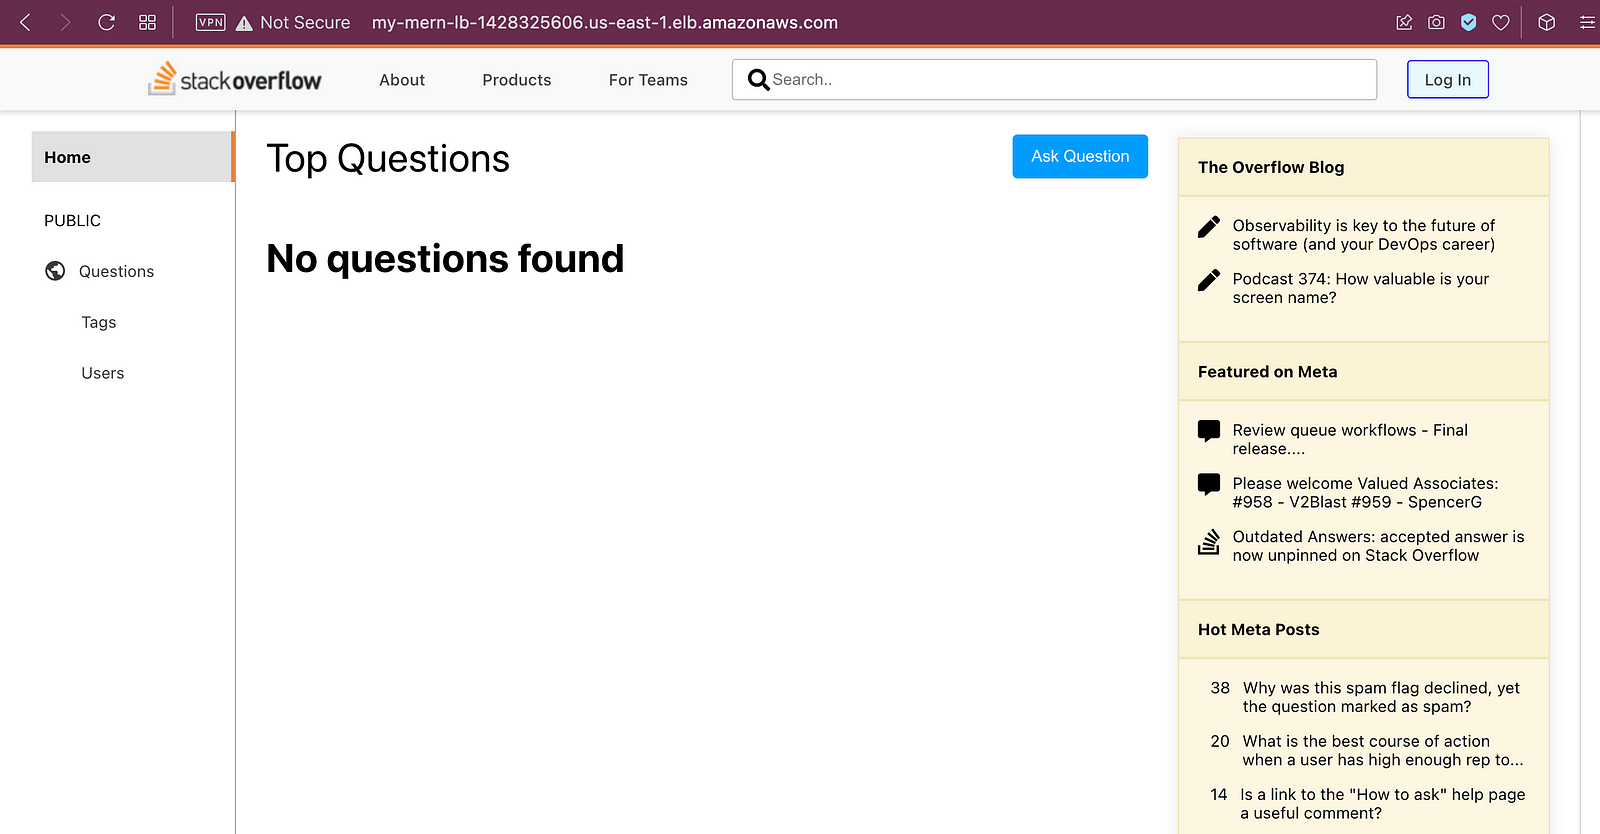
That’s it!!!
The Git repo for this article can be found here.
That’s it! Hope you found the article useful.
Happy Coding!
If you found this post helpful, please like, share, and follow me. I am a developer, transitioning to DevOps, not a writer — so each article is a big leap outside my comfort zone.
If you need a technical writer or a DevOps engineer, do connect with me on LinkedIn: linkedin.com/in/mubin-khalife.
Thank you for reading and for your support!